
When people talk about SEO they think first of optimising the copy, page loading speed and avoiding obvious mistakes.
The last thing on the list, and one that even experienced practitioners often underrate, is image optimisation for SEO.
So why does it matter to optimise images for SEO?
Let's go through it.
Relevance
Search engines, and Google in particular, keep refining their techniques.
Google's image recognition technology in particular detects whether an image is relevant to the content around it.
This carries real weight in how the on-page content is indexed.
Using GIFs or funny pictures to build engagement with readers may not pay off in the long run.
The approach that works is to choose photos or charts that are relevant to the text and add something to the content on the page.
That way Google's algorithm will see our site as a relevant resource for the page and its content.
Google cannot fully understand images on its own
The algorithm that analyses images still cannot tell exactly what an image is about just by looking at it.
That is why it helps to use the tools we have to give it specific signals about what the image shows.
If Google cannot interpret your images properly, they do nothing for your SEO. Images Google cannot make sense of lower the perceived quality of the site and its rankings.
On the other hand, optimising your image files for SEO can make your page more relevant for a specific query and help it reach the top positions in the results.
Images influence online purchases
If you run an e-commerce site or are thinking of opening an online shop, bear in mind that product images are one of the main things shoppers rely on when deciding whether to buy.
This alone shows that images matter for the business itself, as well as for rankings.
Which SEO elements should you consider for images?
Doing SEO with the help of images may sound hard, but it is simpler than it looks.
You only need to pay attention to a few basic steps to compete for the top search results. Here they are.
Image dimensions and file size
Good, high-quality images on your site are an advantage, but you have to watch file size and dimensions.
Oversized images that take a long time to load damage the user experience.
Remember that higher quality means a heavier file.
The web does not need top-quality images, but you should avoid grainy ones.
So always aim for the right balance between image quality and loading speed.
Loading time is a key parameter for SEO.
The faster your page loads, the better its chances of being indexed.
Images have a big impact on this, especially if you plan to upload very large ones.
To avoid the problem, upload the image at the exact size it will be displayed. For example, 640 x 480 instead of 6400 x 4800.
If you use WordPress you can do this in a few clicks.
A tip: optimise the file dimensions too, so your images are fully responsive.
How to resize images
There is plenty of software that can do this, but the best known is Adobe Photoshop.
A cheaper alternative is GIMP, which is free.
With these tools you can choose between different units of measurement and resize the image to the size you need.
Keep in mind that there is no single optimal value: a lot depends on the type of image and the device it will be viewed on.
There are no standard recommended dimensions: it always depends on the device and, above all, on how much space the image has to fill.
In any case, always check that the image is not wider than its container. It is worth checking which dimensions suit your site's layout.
The answer is to upload images at the maximum width you need, which of course depends on your website.
How to compress images
Compression should strike a good compromise between file size and image quality.
A very high-quality image that is slow to load only drives visitors away. Here too, Photoshop and GIMP can help.
As a rough rule of thumb, a resized and compressed image should not weigh more than 100 KB.
In my experience, full-width images can go up to 500 KB if they serve a purpose on the page and the page does not have many images.
File format
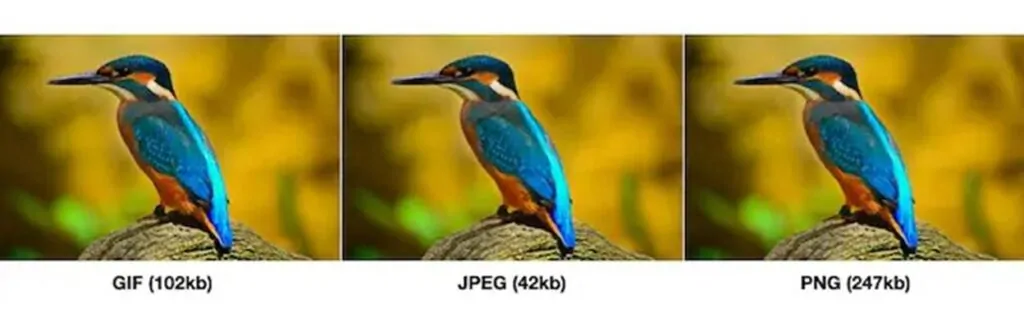
When choosing an image for your website, the file format matters more than people think. The most common formats on the web are JPG and GIF.
JPG is the standard format for web images, offering good quality at a small size. It is used mainly for photographs and images with lots of colours.
GIF, on the other hand, supports transparency and animation. It is often used for small images or animated graphics.
PNG is just as valid a format, used for high-resolution images, but the files are heavier. This can hurt your site's performance, but if you need illustrations and graphics with sharp edges, or you use a lot of screenshots, PNG is the way to go.
Finally, WebP is a format designed to deliver high-quality images at small file sizes. You can convert files to WebP with a tool such as Squoosh.
File name
From an SEO point of view, it is essential to name the file using carefully chosen keywords.
The file name should describe the image in a sensible, realistic way and be optimised for SEO.
If, for example, you add a panoramic photo of Paris to your site, the file could be called "paris-panorama".
What you must avoid is stuffing the file name with keywords in an attempt to over-optimise the content (so-called over-optimisation).
This is a practice Google penalises through its anti-spam algorithms, such as Penguin.
Remember too that if the file name has several words, each one should be separated by a hyphen "-" (the hyphen, not the underscore "_").
When renaming your image, use only the keywords: no articles, prepositions or punctuation.

Responsive images
As mentioned above, uploading responsive images adds value to your site. You will have gathered that it has to do with the dimensions of the file and of the image itself.
But what exactly is a responsive image?
A responsive image uses the srcset attribute, which lets the browser display the right version for the device, adapting the image to the screen size.
This fits perfectly with the mobile-first approach that SEO rewards.
How to optimise images for SEO
Once the image is uploaded, from a ranking point of view there are three ways to tell Google what it shows. WordPress lets you work on all three:
The HTML code of an image looks like this:
<img src="path/image.jpg" alt="Description of the image" title="Description shown on mouse hover" />
- the ALT attribute
- the TITLE attribute of the IMG tag
- the text around the image
Alt text
An image's alternative text (also called ALT, alt tag, alt attribute or text alternative) is a core element of image SEO.
It is what Google's crawler reads to understand what the image shows. In short, Google takes the keywords that describe the image from the ALT attribute, and those are the keywords the image will rank for.
So it needs to be written in a way that lets Google understand exactly what the image contains.
Caption
For SEO it is well worth adding a good caption, the line of text under the image that describes it for the user.
Captions are often skipped because they seem pointless, yet they matter for good SEO rankings.
Title attribute
The title is the image's TITLE attribute, the text you see when you hover the mouse over an image.
The TITLE attribute does not carry much SEO weight, but it helps users understand what an image shows.
Our advice for the title and ALT attributes is to use different text for each, without forcing in keywords or terms that do not match the content.
The text around the image
A search engine like Google can also work out what an image shows from the text around it.
So always take care over the text you place just before and just after the image.
This improves the user experience and makes your image far more relevant from an SEO point of view.
The best tools for optimising images in WordPress
By now it is clear that image optimisation is fundamental to SEO. It is one of the ways the algorithm judges your page as "quality" based on the user experience you offer.
If you use WordPress, it helps to know a few plugins built specifically to optimise the images on your site.
Here are the best:
- WP Smush: ideal for optimising both images already online and new uploads, it also shows you an overview of the MB saved;
- EWWW Image Optimizer: automatically reduces the size of the images on your site, and compresses JPG and PNG files as you upload them;
- Imagify: very easy to use, this plugin compresses both new uploads and images already on the site, and gives you a summary of the MB saved.
How to use images for SEO
Here are some tips on getting the most out of images for SEO and competing for the top search results.
You have probably wondered how many images you should put on a page. In reality, there is no ideal number of images that applies to every site.
It all depends on the search query. That is why at Visilay we suggest searching Google for the query you want to rank for and analysing the top results.
This shows you exactly what Google expects from the pages it has rewarded as the best for that query.
Another point to remember is that the first image should be optimised for the same keyword as the page.
But remember that the image has to fit the query, not the other way round.
If you do the opposite and force the keyword onto an image that is not relevant, your rankings may suffer.
Add structured data to the image
Although structured data is not directly tied to indexing, it lets you give potential customers more information.
That is why adding structured data to your images is worth doing, especially if your site has a lot of visual content.
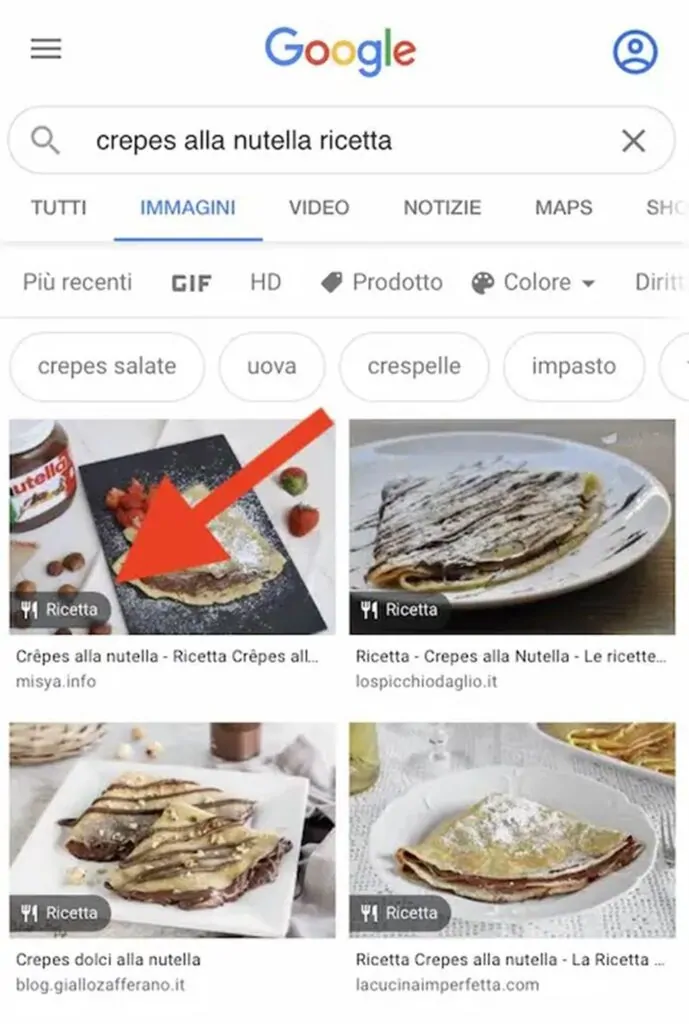
This way Google can show extra information with your image that tells the user straight away what it is when they search in Google Images.

Google Images supports structured data for:
- Videos
- Products
- Recipes
For the markup to be used, each item must include the image property.
Open Graph and Twitter Cards
Sharing a link on social media with an eye-catching image makes it more likely that people will click it.
So you need to choose the right image for link previews, optimise it properly and, above all, make sure it is included every time the page is shared.
To use Open Graph on Facebook and Pinterest, or Twitter Cards on X (formerly Twitter), add this image tag to the <head> section of your HTML page:
<meta property="og:image" content="http://example.com/link-to-image.jpg" />
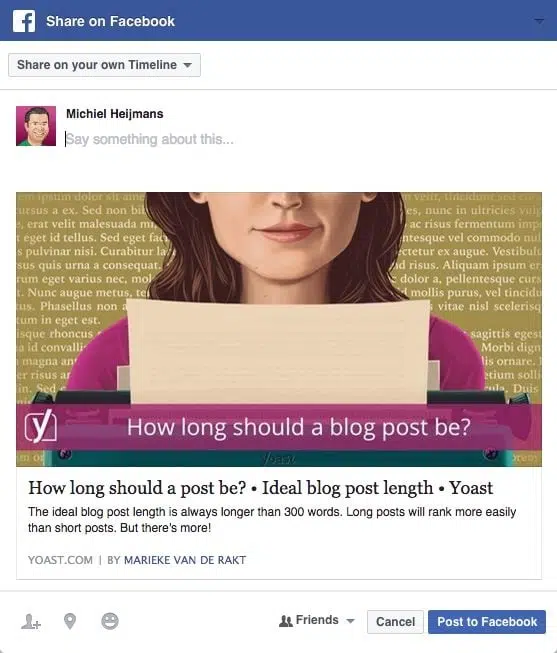
If you want to set up and preview how your posts will look when shared, you can also use a dedicated plugin.
Either way, use a high-quality image, such as the original one you used on your site.
Alignment
There is no written rule on this, but we recommend never placing text to the right of an image.
This applies especially at the start of a paragraph, and when a few lines further down another image is aligned to the left.
Don't worry, SEO will not penalise you for it. But a good user experience is often a matter of details.
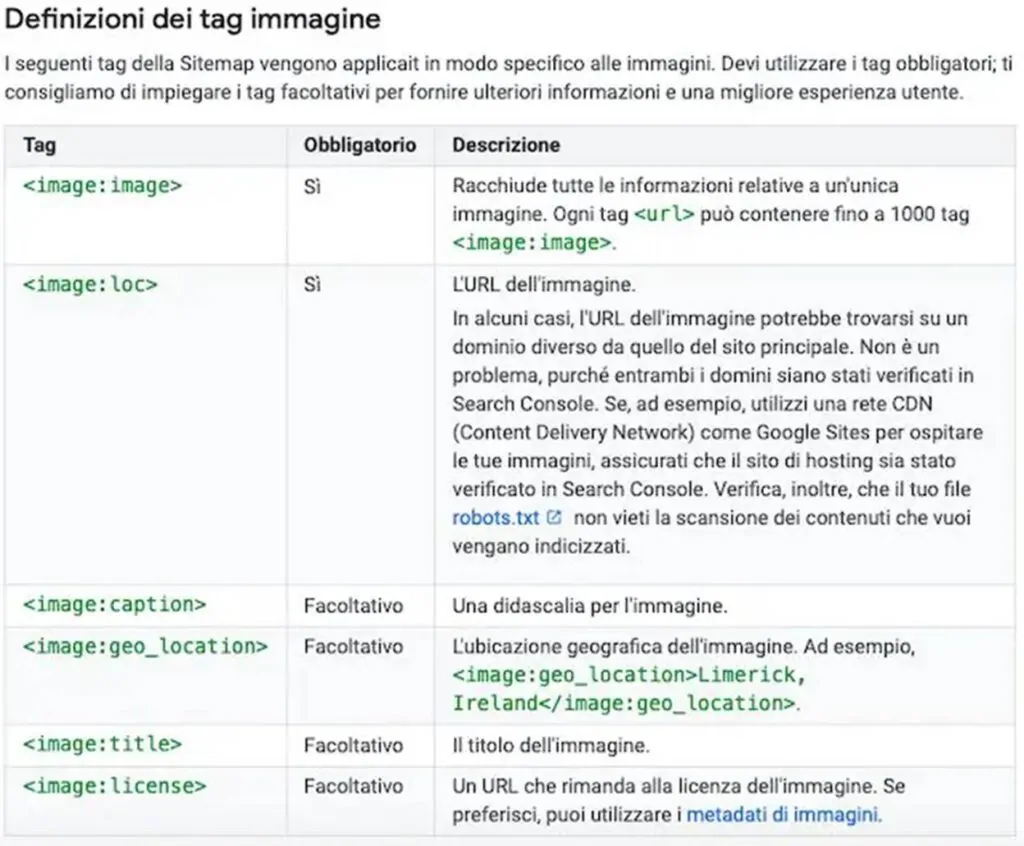
Image sitemap
An image sitemap is very useful for indexing, especially if your site has a lot of images.
A professional photographer's website is a typical example.
The usual approach is to create .xml files separate from the ones for text pages, to keep everything well organised.
This way the search engine can find images it might otherwise struggle to index. To find out more, see Google Search Central's guide to image sitemaps.
Use vector graphics
Consider using other types of image alongside photographs, in particular vector graphics.
Because they are simple and immediate, vector graphics (lines, logos, symbols) are ideal for displaying at high resolution, at any size.
They also tend to be light files that load quickly.
SVG (Scalable Vector Graphics) is the most common vector image format and is well suited to SEO because it stays sharp at any size.
To optimise this type of image easily, I recommend this online tool.
Use lazy loading
Lazy loading tells your site not to load an image until it is about to appear on screen.
This means images load as the user scrolls, which speeds up browsing considerably.
It is a simple change that can make a real difference to the user experience on your site.
Lazy loading is particularly suited to any platform with a large number of high-resolution photos, such as e-commerce sites.
Use browser caching
To speed up the loading of your images you can make use of browser caching.
What is it?
With browser caching, images are stored in your users' browsers the first time they visit your site.
When the same users come back to your page, it loads faster.
For example, if you read this article again tomorrow, your browser will not need to download the images again because they are already stored.
To get the most out of caching, however, you need to take a few steps.
If you use WordPress, just install a plugin such as W3 Total Cache.
If you use another CMS, add this code to your .htaccess file by hand:
<IfModule mod_expires.c>
ExpiresActive On
# Images
ExpiresByType image/jpg "access 1 year"
ExpiresByType image/jpeg "access 1 year"
ExpiresByType image/gif "access 1 year"
ExpiresByType image/png "access 1 year"
</IfModule>
Use a CDN
Even if you are not technical, you will know that every click on your website means a request to your server.
With a server in your own country you will have no trouble reaching local users, but you may struggle to serve those further away.
The result? Slow loading and a poor user experience, which weighs on how people rate your site.
CDNs solve this problem.
CDNs (content delivery networks) are designed to cache your files across a worldwide network of servers.
This way, a visitor in the USA can load your images quickly from the server nearest to them.
The most widely used CDNs today are:
- Cloudflare;
- KeyCDN;
- Amazon CloudFront;
- Google Cloud CDN
Keep in mind, though, that your images will then be hosted on a separate domain.
So if someone embeds one of your photos, the link will point to the CDN rather than to you, and you lose a backlink.
That is why it is advisable to set up a CNAME record.
Here is John Mueller's advice on the subject:
SEO-optimised images: summary
As you have seen, image SEO has to take a number of factors into account.
The algorithm keeps changing, so your aim should be to keep up to date, stay competitive and give users a better experience than your competitors do.
In short, this is what to remember every time you add an image to your site:
- Keep it relevant to the text;
- Give the file a descriptive name;
- Make sure the image dimensions match the displayed size;
- Reduce the file size;
- Use alt text;
- Add structured data;
- Add Open Graph and Twitter Card tags;
- Use an image sitemap;
- Use vector graphics;
- Make the most of CDNs;
- Use lazy loading.
As you have seen, optimising images for SEO has a real effect on how your site ranks. Image loading speed affects search rankings, and users notice it too.
Good images help e-commerce sites convert, and in blog posts they break up the text and make it easier to read, which keeps people reading to the end.
That is why images deserve proper attention in any SEO work.
